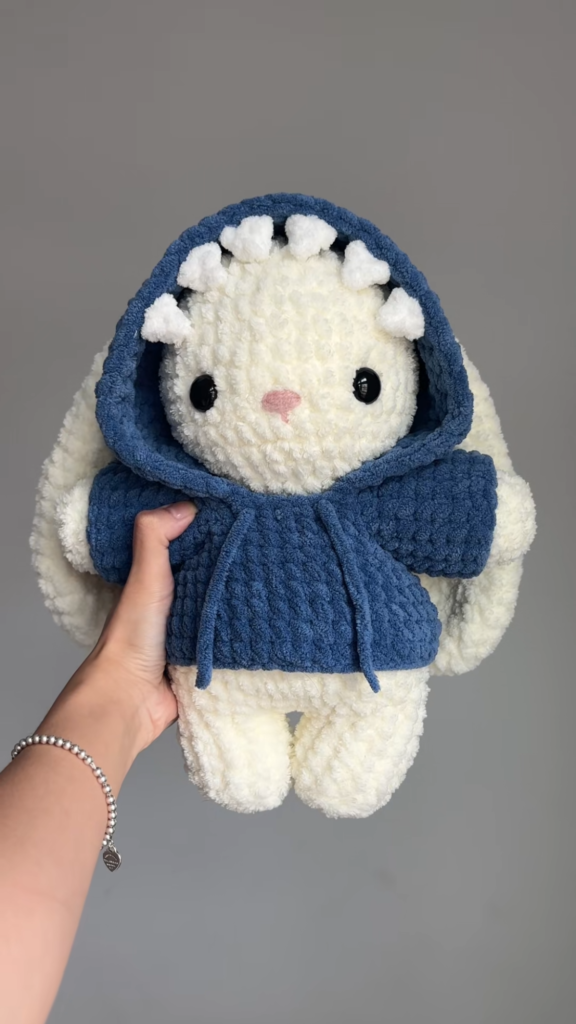
There is something irresistibly fun about a “costumed” character! This bunny is cute on its own, but the added shark hoodie—complete with little felt-look teeth—adds that extra layer of personality. This project is perfect for intermediate crocheters who want to practice garment-making (the hoodie) alongside amigurumi.
Pattern Details
- Skill Level: Intermediate
- Finished Size: Approx. 8 inches tall
- Terminology: US Crochet Terms
- Time Required: 6–8 hours
Materials Needed
- Yarn: Super Bulky (Weight 6) Chenille/Velvet Yarn.
- Colors: Cream (Bunny), Navy Blue (Hoodie).
- Hook: 5.0mm or 6.0mm.
- Safety Eyes: 16mm or 20mm black.
- Extras: White felt (for the teeth), hot glue or fabric glue, polyester fiberfill, tapestry needle, stitch markers.
The Pattern
The Bunny Body
Start with Cream yarn:
- MR, 6 sc (6)
- Inc around (12)
- [1 sc, inc] 6 times (18)
- [2 sc, inc] 6 times (24)
- [3 sc, inc] 6 times (30)
- [4 sc, inc] 6 times (36)
7-12. Sc around (36) - [4 sc, dec] 6 times (30)
- [3 sc, dec] 6 times (24)
Insert safety eyes between rows 9 and 10. - [2 sc, dec] 6 times (18)
- [1 sc, dec] 6 times (12)
- Dec 6 times, FO.
Bunny Ears (Make 2)
- MR, 6 sc (6)
- [1 sc, inc] 3 times (9)
3-12. Sc around (9)
Flatten and fold the base to create the long bunny shape. Sew to the top of the head.
The Shark Hoodie
Using Navy Blue yarn:
- Ch 30, join to form a loop.
- Sc around (30) for 10 rows. This creates the “hood” shape.
- To create the hood opening: Stop joining in the round. Work back and forth for 6 rows, leaving an opening for the bunny’s face.
- The Shark Fin: On the top center of the hood, work a small triangle: [Ch 4, sc back down the chain with increases at the base].
Expert Tips for the “Costume” Look
1. The Shark Teeth
The teeth are the most important part! Use a stiff white felt. Cut small triangles and use a tiny drop of fabric glue to attach them to the inner edge of the hood opening. Felt is much easier to work with than crocheting individual tiny teeth, and it gives the hood a crisp, professional “toothy” look.
2. Attaching the Hoodie
Because the bunny ears are long, you will need to cut small slits in the top of the hoodie (reinforced with a little sewing so they don’t unravel) to pull the bunny ears through. This ensures the hoodie stays in place and doesn’t slide off the bunny’s head!
3. The “Hooded” Expression
When placing your safety eyes on the bunny, put them slightly lower than usual. Because the hood covers the top of the bunny’s head, the eyes often get hidden. By positioning them slightly lower, you ensure the bunny’s “expression” is visible even with the hoodie up.
4. Hoodie Ties
Take two strands of the Navy Blue yarn and braid them together to make the hoodie strings. Thread them through the bottom row of the hoodie using your tapestry needle, and tie them in a cute knot at the bunny’s neck. This adds a realistic “sweatshirt” detail that ties the whole look together.
Ready to start your Shark-Bunny?
This is a high-reward project—everyone who sees it will want to squeeze it! Remember that since you’re using velvet yarn, your tension should be nice and firm so the stuffing doesn’t peek through the gaps.