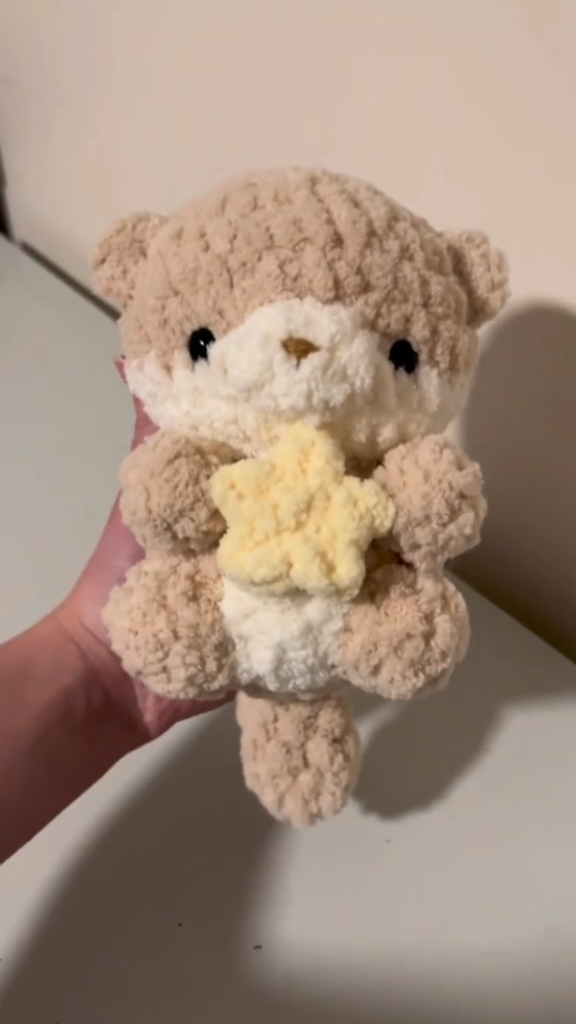
Whether you’re crafting for a sea-life lover or simply building your collection of whimsical friends, this sea otter is a joy to create. His rounded features, soft tummy patch, and precious handheld star make him an instant favorite for anyone who needs a pocket-sized cuddle buddy.
Pattern Details
- Skill Level: Beginner-Intermediate
- Finished Size: Approx. 6 inches tall
- Terminology: US Crochet Terms
- Time Required: 4–5 hours
Materials Needed
- Yarn: Super Bulky (Weight 6) Chenille or Velvet Yarn.
- Colors: Light Brown/Tan (Body), Cream/Off-White (Tummy Patch/Face), Soft Yellow (Star).
- Hook: 5.0mm or 6.0mm.
- Safety Eyes: 16mm or 20mm Black.
- Extras: Polyester fiberfill, tapestry needle, stitch markers, black embroidery thread (nose/mouth).
Abbreviations
- MR: Magic Ring
- sc: Single Crochet
- inc: Increase
- dec: Invisible Decrease
- ch: Chain
- st(s): Stitch(es)
- FO: Fasten off
The Pattern
Head
Start with Light Brown.
- MR, 6 sc (6)
- Inc around (12)
- [1 sc, inc] 6 times (18)
- [2 sc, inc] 6 times (24)
- [3 sc, inc] 6 times (30)
6-10. Sc around (30) - [3 sc, dec] 6 times (24)
- [2 sc, dec] 6 times (18)
Insert safety eyes between rows 8 and 9, 5 stitches apart. - [1 sc, dec] 6 times (12)
- Dec 6 times, FO.
Body
Start with Light Brown.
- MR, 6 sc (6)
- Inc around (12)
- [1 sc, inc] 6 times (18)
- [2 sc, inc] 6 times (24)
- [3 sc, inc] 6 times (30)
- [4 sc, inc] 6 times (36)
7-10. Sc around (36)
Change to Cream yarn for the belly patch in the center. - [4 sc, dec] 6 times (30)
- [3 sc, dec] 6 times (24)
- [2 sc, dec] 6 times (18)
Stuff firmly and FO.
The Star
Using Soft Yellow.
- MR, 5 sc (5)
- Inc in each st (10)
- Points: [Ch 3, skip 1 ch, sc in next ch, sl st in base stitch] repeat 5 times.
FO and sew to the center of the otter’s tummy.
Expert Tips for a Professional Finish
- The Tummy Patch: To get the look of the “cream” belly, you can either crochet a flat oval separately and sew it on, or perform color changes while working the body. Sewing a separate piece on top of the tummy gives a cute “appliqué” look that is perfect for beginners.
- The Nose & Smile: Use a thin, dark embroidery thread to stitch a small upside-down triangle for the nose. Don’t worry about it being perfect! A slightly crooked nose just adds to the charm of a handmade creature.
- Safety First: Since chenille yarn is so soft, make sure you pull your safety eye washers on tight until you hear a “click.” If this is intended for a very small baby, skip the safety eyes and embroider them instead.
- Brushing: If your seams look a little messy, take a soft-bristled brush and gently brush over the fur. It hides the stitches and makes the otter look like a fluffy, singular piece!
Ready to start your otter?
This project is so rewarding because of how quickly it comes together. Whether you make a whole family of otters or keep this one for your own desk, it’s a beautiful testament to your crafting skills.