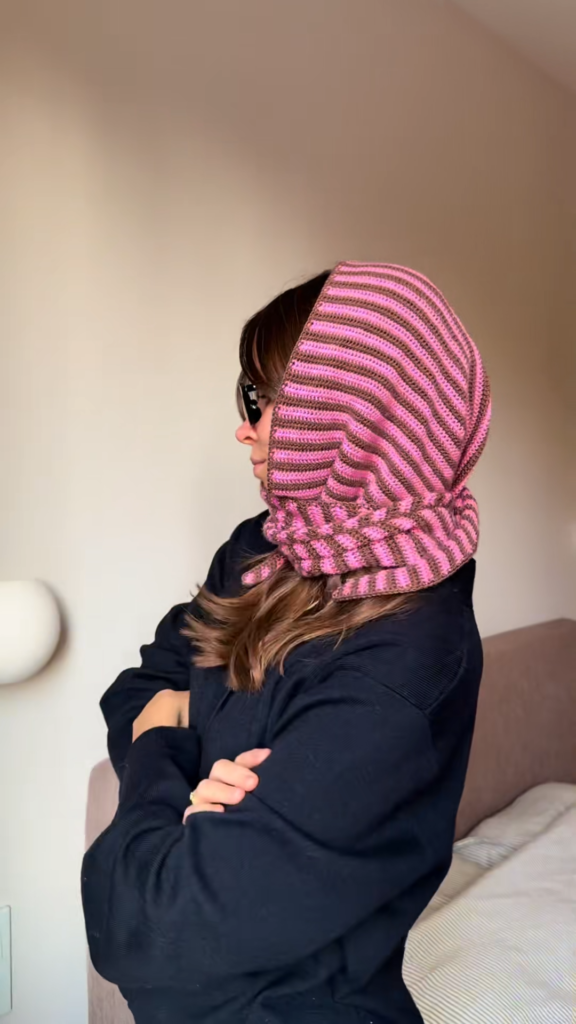
There is something undeniably timeless about a hooded scarf. It is the ultimate fusion of utility and fashion—a piece that keeps you warm during brisk morning walks while adding a vintage, cinematic flair to your outfit. With its playful stripe design and cozy merino wool texture, this hooded scarf is the perfect “quick-win” project for anyone wanting to dabble in garment making.
Whether you’re channeling 1950s screen siren vibes or just looking for a functional piece to bundle up in, this pattern is your go-to guide.
Project Overview
- Skill Level: Beginner-Intermediate
- Time Commitment: 5–7 hours
- Style Notes: Using a ribbed stitch pattern gives the fabric excellent “stretch” and a soft drape, making it comfortable to wrap around your head or neck without feeling stiff.
What You’ll Need
- Yarn: Drops Baby Merino (or any fine/fingering weight 100% Merino wool). It’s incredibly soft against the skin, breathable, and provides that luxurious, high-end finish.
- Colors: Two contrasting colors (e.g., Hot Pink and Espresso Brown) to create that striking, modern striped effect.
- Hook: 3.0mm – 3.5mm crochet hook.
- Extras: Tapestry needle and scissors.
Master the “Ribbed” Texture
The key to that soft, stretchy look is the Back Loop Only (BLO) Half Double Crochet (HDC) stitch. By working into only the back loop of the stitch from the row below, you create a beautiful “knitted” ribbing effect that is much stretchier than a standard crochet stitch.
Step-by-Step Construction
Phase 1: The Foundation
- Chain: Start with a long foundation chain (approx. 120–140 stitches). The length will determine how far the “scarf” portion hangs down.
- Stripes: To achieve the clean stripes seen in the video, switch your yarn color every 2 rows. When switching colors, carry the unused yarn up the edge of your work—since this edge will be hidden when you wear it, you save yourself the headache of weaving in hundreds of ends!
Phase 2: Building the Hood
- The Rectangle: Work your rows back and forth in the BLO HDC stitch until your piece is wide enough to cover your head comfortably (approx. 12–14 inches wide).
- The Fold: To create the “hood” shape, you will fold the rectangle in half and sew (or slip stitch) one of the short ends closed. This creates the rounded top of your hood.
- The Finish: Continue working your ribbed rows from this center point out to the ends of the scarf to create the long, elegant “tails” that drape around your neck.
Expert Tips for a Professional Finish
1. The Color Transition Trick
When working stripes, avoid cutting your yarn if possible. By carrying the yarn along the side of the project, you’ll find that the “seams” are much cleaner, and your finished accessory feels more durable and polished.
2. Blocking is Everything
Merino wool loves to be blocked. Once you’ve finished crocheting, soak your scarf in cool water with a little wool wash. Lay it flat on a towel, gently stretch out the ribbed fabric to define the stitches, and let it dry. This step is what makes a handmade item look like a luxury retail piece.
3. Choosing the Right Weight
The video uses a fine merino wool. I strongly recommend sticking to this weight. Using a bulky yarn for this specific pattern will result in a hood that is too thick and heavy, making it difficult to style. Fine yarn allows the scarf to drape elegantly.
Why Handmade Fashion Matters
In a world of mass-produced scarves, wearing a handmade hooded scarf is a statement. It’s a quiet testament to your time, your patience, and your unique sense of style. Merino wool is a natural, sustainable fiber that keeps you warm without overheating, making this piece perfect for transitional weather—from the first bite of autumn air to the early days of spring.
Final Assembly Checklist:
- Are your ends secured properly?
- Have you checked the symmetry of your stripes?
- Did you give it a good block to set those beautiful ribs?
Ready to start your hood?
Grab your hook, choose your two favorite color combinations, and start that first chain. Don’t rush the process—the rhythm of the stripes is part of the therapy. Once you finish, wrap it around your shoulders, pull up the hood, and feel the luxury of having crafted your own chic, cinematic accessory.