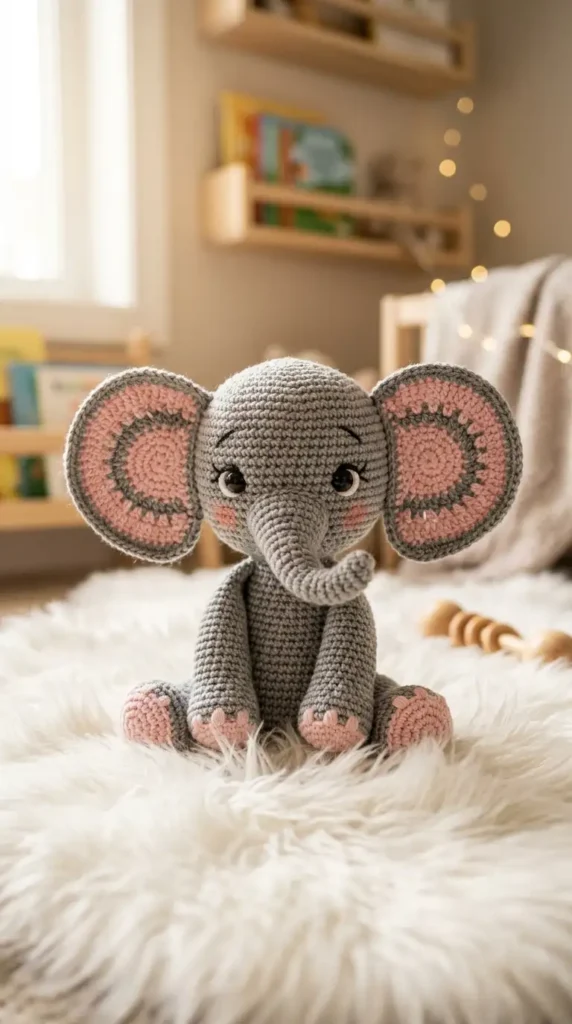
There is something undeniably enchanting about a baby elephant. With those oversized, expressive ears and that sweet, curious trunk, they represent innocence and wonder. If you have been dreaming of creating a handcrafted companion that looks like it stepped out of a storybook, this pattern is your perfect match.
This project focuses on proportion and personality. By balancing a large, friendly head with a sturdy, seated body, you’ll create a piece that isn’t just a toy—it’s a work of art.
Project Overview
- Skill Level: Intermediate
- Finished Size: Approx. 7–8 inches tall
- Time Required: 8–10 hours
- Style Notes: Focus on tight tension to ensure the stuffing doesn’t show through.
What You’ll Need
- Yarn: DK or Sport weight cotton. Colors: Soft Grey (Body), Dusty Pink (Inner ears/feet).
- Hook: 2.5mm or 3.0mm.
- Safety Eyes: 10mm or 12mm black safety eyes.
- Extras: Embroidery thread (black for eyelashes, pink for cheeks), polyester fiberfill, tapestry needle, and stitch markers.
The Pattern
Head
Start with Grey yarn.
- MR, 6 sc (6)
- Inc in each st (12)
- [1 sc, inc] 6 times (18)
- [2 sc, inc] 6 times (24)
- [3 sc, inc] 6 times (30)
- [4 sc, inc] 6 times (36)
- [5 sc, inc] 6 times (42)
8-14. Sc in each st around (42) - [5 sc, dec] 6 times (36)
- [4 sc, dec] 6 times (30)
Insert safety eyes between rows 11 and 12, approx 7 stitches apart. - [3 sc, dec] 6 times (24)
- [2 sc, dec] 6 times (18)
Stuff firmly and FO.
The Trunk
- MR, 6 sc (6)
- [2 sc, inc] 2 times (8)
3-10. Sc around (8)
Stuff lightly and sew to the center of the face.
Large Ears (Make 2)
Start with Pink yarn.
- MR, 6 sc (6)
- Inc in each st (12)
- [1 sc, inc] 6 times (18)
- [2 sc, inc] 6 times (24)
Switch to Grey. - [3 sc, inc] 6 times (30)
- [4 sc, inc] 6 times (36)
Fold slightly and sew to the sides of the head.
Body
- MR, 6 sc (6)
- Inc in each st (12)
- [1 sc, inc] 6 times (18)
- [2 sc, inc] 6 times (24)
- [3 sc, inc] 6 times (30)
- [4 sc, inc] 6 times (36)
7-12. Sc around (36) - [4 sc, dec] 6 times (30)
- Sc around (30)
- [3 sc, dec] 6 times (24)
- [2 sc, dec] 6 times (18)
Stuff firmly and sew to the head.
Pro-Tips for a Professional Look
1. Achieving the “Storybook” Face
Notice the eyelashes in the image? Once you’ve secured your safety eyes, use a single strand of black embroidery thread to stitch tiny, upward-curved lines at the outer corners of the eyes. This simple detail instantly transforms a generic toy into a character with a “soulful” expression.
2. The Inner Ear Contrast
The secret to the elephant’s cuteness is the pink inner-ear circle. By working the first 4 rounds in pink and then switching to grey for the final border, you create a natural, seamless transition that looks store-bought. Use a whip stitch to attach the ears, catching only the inner loops of the grey border for a clean, invisible seam.
3. Stuffing Density
For the body to support that large, heavy head, ensure your neck area is stuffed very firmly. If the head feels wobbly, don’t hesitate to add a little extra stuffing at the seam between the head and body. This helps the elephant stay upright and proud.
4. Blush for Personality
For that soft, healthy “baby” glow on the cheeks, use a small amount of powdered makeup blush and a makeup brush. Gently buff it onto the cheeks area. It adds a warmth that yarn alone cannot achieve.
Why Handmade Matters
There is a specific kind of magic in creating an amigurumi character. Every increase and decrease is a small act of focus. As you work on this elephant, remember that your tension is part of the character’s charm. If your stitches are a little tighter or looser than the pattern suggests, that is what makes your piece one-of-a-kind.
Ready to start?
Gather your supplies, find a comfortable spot, and let your creativity flow. Whether this elephant is for a nursery or a display shelf, it is sure to be a beloved keepsake for years to come.