There is a specific kind of magic that happens when the weather starts to shift. The heavy wool sweaters get tucked away, and suddenly, I find myself craving something light, breathable, but still cozy enough for those breezy spring afternoons. As someone who has spent over three decades with a crochet hook in hand, I’ve learned that the best projects aren’t always the most complicated ones. Sometimes, the most stunning pieces are the ones that prioritize silhouette and texture over intricate stitch work.
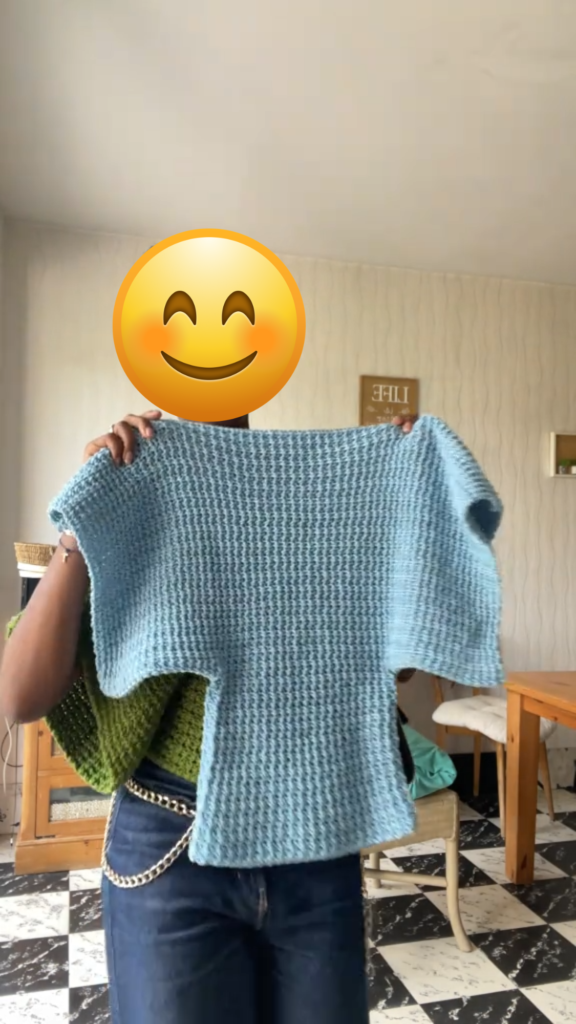
Today, I want to walk you through a project that has become a true staple in my wardrobe—and one that I get asked about every single time I wear it. It’s an oversized, off-the-shoulder textured top that manages to look “boutique-bought” while being incredibly simple to construct. Whether you’re a beginner looking to move beyond scarves or an experienced maker wanting a relaxing “palette cleanser” project, this is the one for you.
Grab your favorite mug of tea, find a sunny spot by the window, and let’s get into the details of this gorgeous DIY crochet project.
Project Level: Advanced Beginner
If you can chain, single crochet, and keep a relatively straight edge, you can make this top. The “advanced” part comes simply from the assembly and the patience required for a larger garment, but I promise the stitches themselves are beginner-friendly.
Estimated Time to Complete
12–18 hours.
Since this is an oversized piece, it does take some time to build up the fabric. However, because the stitch pattern is repetitive, it’s the perfect “Netflix and Stitch” project. You’ll find you can finish a panel in a few long evenings.
Materials Needed: What’s in My Project Bag?
I’m very picky about yarn for garments. For a spring or summer top, you want drape and breathability.
- Yarn: I highly recommend a Cotton or Bamboo blend. A weight 3 (Light/DK) or a light weight 4 (Worsted) works best. Look for something with a bit of “flow.” For this project, you’ll need approximately 1,200–1,500 yards depending on your size.
- Pro Tip: Use a variegated or heathered yarn to give the texture even more depth!
- Hook Size: 5.0mm (H) or 5.5mm (I). We want the stitches to be slightly loose to ensure the top hangs beautifully off the shoulder.
- Measuring Tape: Essential! We will be “crocheting to measurements” rather than a strict stitch count.
- Stitch Markers: To help keep track of your rows and where to join the panels.
- Yarn Needle & Scissors: For that final, satisfying finish.
Abbreviations (US Terms)
- Ch: Chain
- Sc: Single Crochet
- Dc: Double Crochet
- Sk: Skip
- St(s): Stitch(es)
- Sp: Space
The Secret Stitch: The Moss Stitch Variation
For this top, we are using a variation of the Moss Stitch (also known as the Granite or Linen stitch). It creates a woven-look fabric that isn’t too “holey” but has incredible flexibility.
The Pattern: [Sc 1, Ch 1, Sk 1] across the row. On the next row, you place your Sc into the Ch-1 spaces of the previous row. It’s rhythmic, simple, and looks stunning in solid colors like moss green or sky blue.
Step-by-Step Instructions
Step 1: Taking Your Measurements
Instead of following a standard S/M/L, I want you to measure yourself. This ensures the “off-the-shoulder” look hits exactly where you want it.
- Width: Measure from elbow to elbow across your chest. This will be the total width of your garment (including the “sleeves”).
- Length: Measure from the top of your shoulder down to your waist (or hip, if you want a tunic style).
Step 2: Creating the Front Panel
We are going to crochet two identical large rectangles.
- Foundation: Chain a length that matches your “Elbow to Elbow” measurement. Make sure it is an even number.
- Row 1: Sc in the 4th ch from the hook. Ch 1, skip 1 ch, Sc in the next ch. Repeat from * to * until the end. Turn.
- Row 2: Ch 2. Sc in the first ch-1 space. Ch 1, skip the Sc, Sc in the next ch-1 space. Repeat to the end, finishing with a Sc in the turning chain space. Turn.
- The Growth: Repeat Row 2 until your panel reaches your desired length.
- Finish: Fasten off and leave a long tail (about 20 inches) for sewing later.
Step 3: Creating the Back Panel
Repeat Step 2 exactly. You want two identical “T-shape” or rectangular pieces. (In the version I often make, I keep them as simple rectangles for that boxy, oversized “kimono” vibe).
Step 4: Assembly (Where the Magic Happens)
Lay your two panels flat on top of each other, right sides facing in.
- Shoulders: Using your stitch markers, mark out the neck opening. Since this is an off-the-shoulder top, you want a wide opening (usually 10–12 inches).
- Seaming the Shoulders: Use the mattress stitch or a simple slip stitch to join the outer edges (the “sleeves”) up to your neck markers.
- Side Seams: Measure down from the top for your armholes (I like a very wide 9–10 inch armhole for this style). Mark it. Sew from the bottom of the top up to that marker.
Step 5: Finishing the Neckline
Turn the garment right side out. To keep the neckline from stretching out over time, I like to do one round of single crochet all the way around the neck opening. It “anchors” the piece and gives it a professional finish.
Tips from My 40+ Years of Experience
- The “Drape” Test: After you finish about 4 inches of your first panel, hold it up. Does it feel stiff like a rug, or does it move like fabric? If it’s stiff, go up a hook size. You want this top to flow with your body.
- Check Your Edges: It’s easy to lose a stitch at the end of the moss stitch row. Always make sure you are ending with a single crochet in that turning chain space.
- Blocking is Non-Negotiable: Because this is a garment made of cotton or bamboo, it needs to be blocked. Wet your finished top, lay it flat on a towel, and pin it to the exact measurements you want. This opens up the stitches and makes the texture look 100% better.
Common Mistakes to Avoid
- Too Small Armholes: This style is meant to be breezy. If the armholes are too tight, it will pull the neck in and you’ll lose that off-the-shoulder “cool girl” look.
- Yarn Weight Mismatch: Don’t try to use a heavy, chunky wool for this. It will end up looking like a boxy armor rather than a soft spring top. Stick to light, summer-friendly fibers.
- Forgetting the Tail: Always leave long tails for seaming. Using a separate piece of yarn for sewing can sometimes lead to weak spots; using the existing yarn tail is much more secure.
Why You’ll Love This Pattern
This top is the ultimate “confidence piece.” Because it’s oversized and boxy, it’s incredibly flattering on all body types. It hides what you want it to hide while highlighting the collarbones and shoulders—which I think is one of the most elegant parts of a woman’s silhouette.
Plus, it’s versatile! Pair the moss green version with dark denim and a statement necklace for a dinner date, or wear the light blue version over a swimsuit at the beach. It’s a step-by-step crochet win that looks like you spent a fortune at a handmade market.
Conclusion
Crocheting your own clothes is a journey of patience, but the reward is a wardrobe filled with pieces that actually mean something. This textured off-the-shoulder top is more than just a “DIY crochet project”—it’s a piece of art you get to live your life in.
I hope you find the process as therapeutic as I do. There’s something so grounding about the repetitive motion of the hook and the slow growth of the fabric. Once you finish your first one, I guarantee you’ll be looking for your next color choice. Happy hooking, and enjoy your beautiful new spring top!