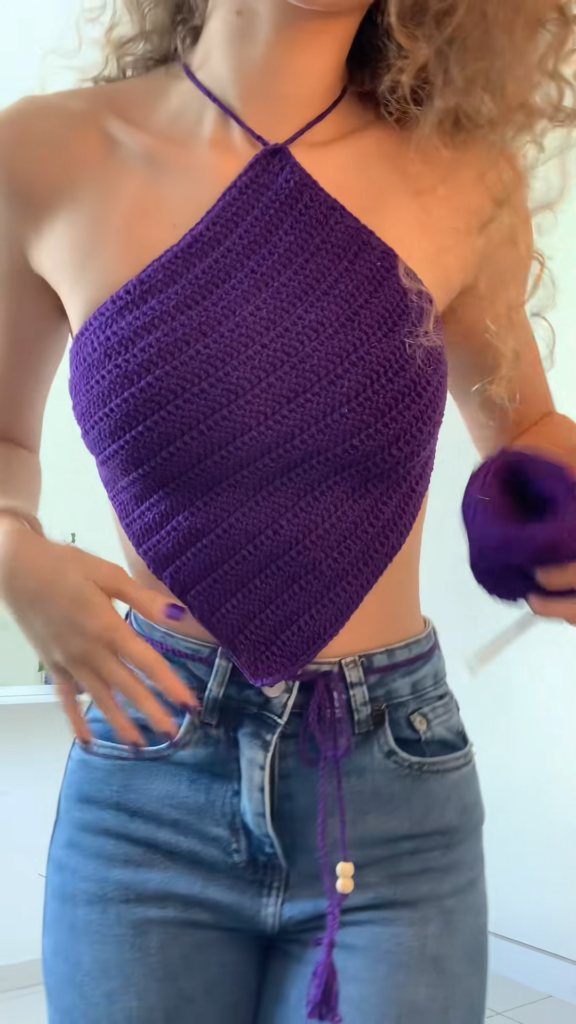
There is a specific kind of magic that happens when you take a simple ball of yarn and, through the rhythmic dance of a crochet hook, transform it into something wearable. The halter top featured in the video is a modern staple—perfectly cropped, elegantly pointed, and deeply versatile. Whether you are prepping for a summer festival, a sunny brunch, or just want to add a handmade touch to your everyday look, this top is the perfect project to elevate your craft.
Let’s dive into the world of high-fashion crochet and build this piece together, step-by-step.
Project Overview: Why This Design Wins
This halter top is a favorite among modern makers for three reasons: simplicity, fit, and style.
- The Shape: By using a V-shaped increase pattern, you create a flattering drape that contours to the body without the need for complicated tailoring.
- The Skill Level: Intermediate. If you are comfortable with Half Double Crochet (HDC) and simple increases, you can absolutely master this.
- The Vibe: The rich purple hue paired with the bohemian tassel details makes it look like a boutique-purchased item.
What You Will Need
Before we start the first loop, gather your materials. Quality matters when you are making garments that need to move with your body.
- The Yarn: Choose a soft, durable Cotton or Mercerized Cotton yarn (a #3 or #4 weight). Mercerized cotton has a slight sheen that catches the light beautifully and is breathable enough for warm weather. Avoid 100% acrylic if you want it to feel premium.
- The Hook: A 3.5mm (E) or 4.0mm (G) crochet hook. Pro-tip: Check your yarn label for the recommended hook size and consider going down half a size to ensure your stitches are tight enough to provide support.
- The Notions: A tapestry needle for weaving in ends, sharp scissors, and wooden beads (optional) to elevate those tassel details.
Master the Foundation: The Stitch Technique
The beauty of this top lies in the Half Double Crochet (HDC) stitch. It sits somewhere between a single and a double crochet, offering the perfect balance of flexibility and structure. It is dense enough to provide coverage while remaining light and airy.
How to execute the V-Increase:
The entire piece is built on a “Center Increase.” In every row, you will be crocheting into the center chain space. You will work 2 HDC, Chain 1, and 2 HDC into that same central loop. This is exactly what creates that elegant, pointed bottom edge.
Step-by-Step Construction
Phase 1: The Main Body
- Start at the Top: Unlike many projects, we are starting at the neck/top section. Chain about 10–15 stitches (depending on how wide you want the neckline).
- HDC Rows: Begin your HDC rows. At the center of your row, perform your V-Increase (2 HDC, Ch 1, 2 HDC).
- Consistent Growth: Continue working back and forth, increasing at that center point every single row. You will see the triangle begin to form instantly.
- Checking the Fit: Because this is a customizable garment, stop after every 5-10 rows and hold it up to your chest. The top corners should reach just under your armpits. Do not rush this—getting the “width” right now is the most important part of ensuring the top fits perfectly.
Phase 2: The Edging & Support
Once the triangle is long enough to cover your torso to your desired crop length, do not cut the yarn!
- Border Work: Single crochet (SC) around the entire perimeter of the triangle. This gives the garment a clean, “finished” edge that prevents rolling and adds durability.
- The Tie Strategy: You have two options here. You can either crochet two long chains (about 120-150 chains long each) to be used as ties, or you can continue the yarn from the corners to create integrated straps. The integrated strap look (seen in the video) is cleaner and more professional.
Phase 3: The Tassel Details
The “Princess” factor of this top comes from the tassels.
- Cut 10-15 strands of yarn, each about 6 inches long.
- Fold them in half.
- Use your crochet hook to pull the folded loop through the bottom tip of your V-shaped top.
- Pull the loose ends through that loop and tighten.
- Slide your wooden bead onto the tassel ends for that refined, high-fashion finish.
Expert Tips for a Professional Finish
1. Blocking is Non-Negotiable
Have you ever finished a crochet top and felt it looked a little… “wonky”? That’s where blocking comes in. Once your top is complete, soak it in cool water with a little gentle detergent. Lay it flat on a towel, stretch it into the perfect shape, and pin it down with rust-proof pins. Let it dry completely. This aligns the stitches and transforms a handmade item into a professional garment.
2. Managing Tension for Support
If you have a larger bust and are worried about support, add a row of “Foundation Single Crochet” (FSC) to the bottom edge. This creates a slightly more rigid band that helps the top sit securely against your skin without needing to be tied so tightly that it becomes uncomfortable.
3. Choosing Your Color Palette
The deep purple in the video is stunning, but don’t limit yourself! Jewel tones like emerald green, royal blue, or deep berry are incredible for evening wear. If you want a summer-ready vibe, go for crisp white or sunny mustard yellow. Because this project uses a moderate amount of yarn, it’s also a perfect way to use up those “leftover” skeins you’ve been hoarding.
The Philosophy of the Handmade Wardrobe
In a world of fast fashion, there is a quiet rebellion in wearing something that took hours of your life to create. When you wear this top, you aren’t just wearing clothes—you are wearing the time, the focus, and the intention you put into every single row.
This halter top is a gateway. Once you see how easily you can manipulate yarn to fit your own unique silhouette, you’ll never look at clothing the same way again. You’ll start thinking, “Why buy it when I can make it better, with a better fit and better materials?”
Final Assembly Checklist:
- Are all your ends woven in securely? Use a tapestry needle and weave them back and forth through at least three different stitches to ensure they don’t pop out in the wash.
- Have you reinforced the strap connections? A tiny drop of clear fabric glue on the knot of your straps can offer extra peace of mind.
Are you ready to claim your title as a DIY Queen?
Grab your hook, find your color, and start that first chain. Remember: the first row is always the hardest, and the last row is the most rewarding. Don’t be afraid to make mistakes—that’s just the yarn teaching you how to get better.