

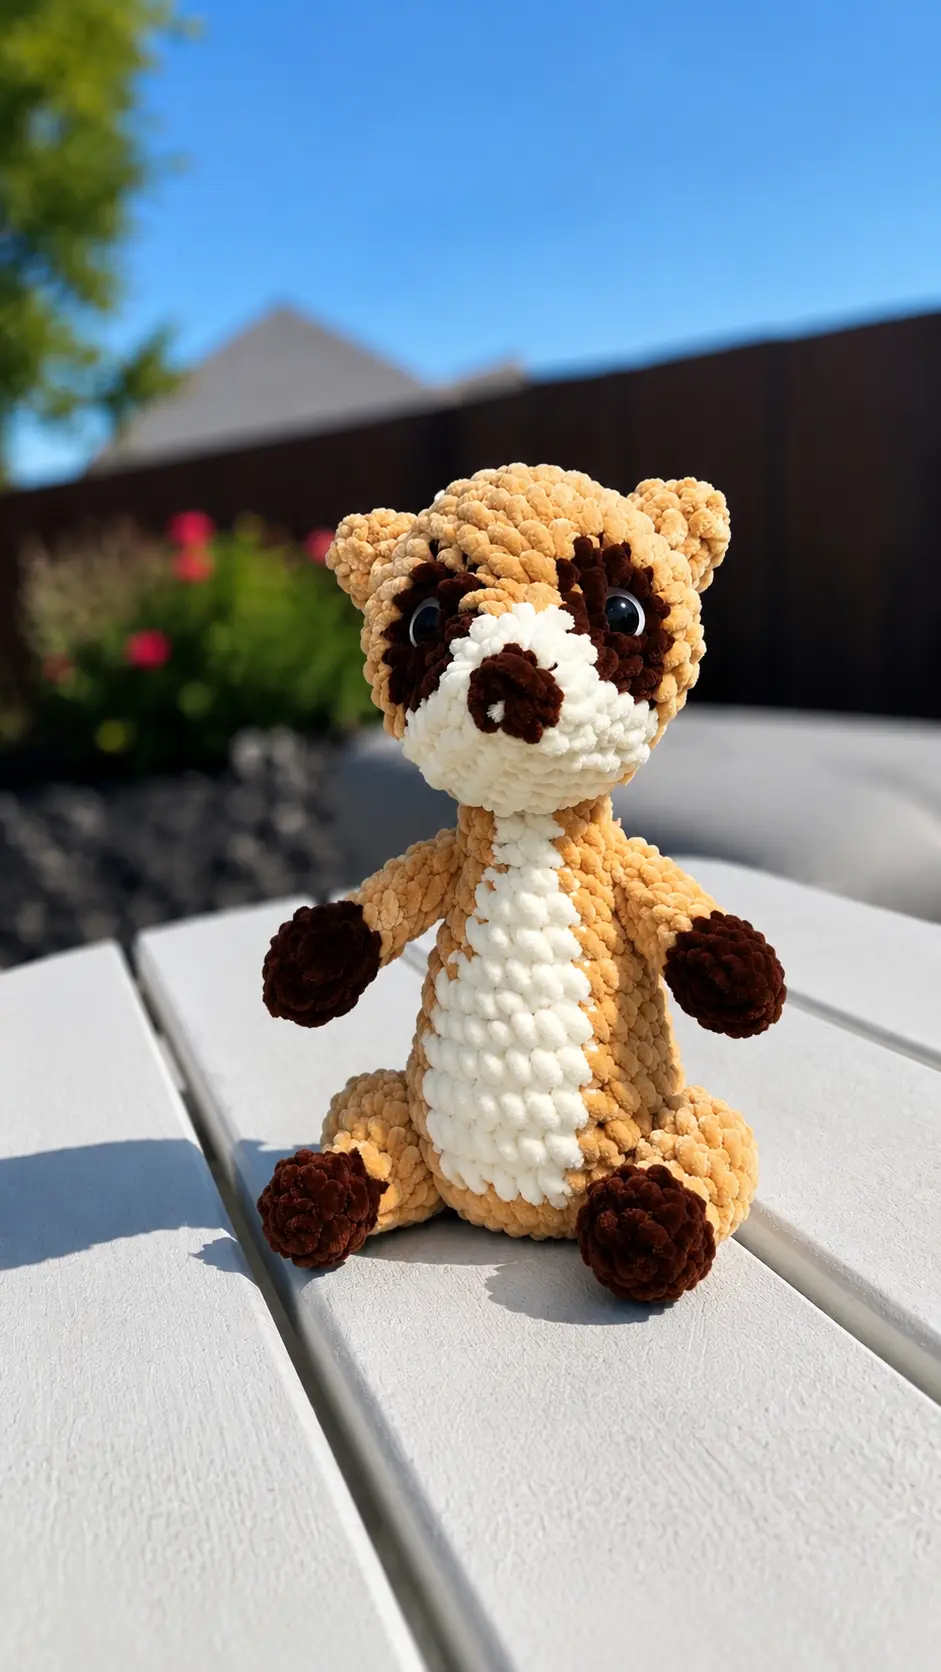
My daughter has been really into houseplants lately. She’s got little pots lined up on her windowsill, and she talks about them like they’re her babies. So when I came across this little otter holding a tiny potted plant, I honestly laughed out loud. I knew right away I had to make one for her.
I sat down with it one evening after she had gone to bed, thinking I’d just get a start on it. Next thing I knew, it was past midnight and I had a tiny stuffed otter sitting in my palm. I couldn’t put it down. There’s something about making a small creature like this that just pulls you in completely. Every little piece, the chubby body, the folded-flat arms, that sweet little snout, it all comes together in the most satisfying way.
If you love amigurumi and you’ve been looking for a crochet otter pattern that’s genuinely fun to make, this is the one. It’s approachable enough for someone with some basic amigurumi experience, and the finished result is so charming you’ll want to make a whole shelf full of them.
What You’ll Need
- Yarn in light brown, white, green, yellow, and dark brown (2mm velvet yarn recommended)
- Crochet hook the same size or smaller than the width of your yarn (2.5mm recommended)
- Safety eyes (5mm recommended)
- Stitch markers
- Polyfill stuffing
- Scissors
- Sewing needle
- Glue
- Felt in black or brown
- Optional: sewing pins, pink felt or makeup for blush
Finished Size
Approximately 9 cm tall and 5 cm wide. Size may vary depending on your hook, yarn, and tension.
Pattern Notes
This pattern is written in US terminology and uses joined rounds, unless stated otherwise. The type of round used will be shown at the top of every section.
How to Do Joined Rounds: At the end of a round, slip stitch into the first stitch of the round, then pull tight and chain 1. The first stitch of the next round is worked in the same stitch you just slip stitched into.
Yarn Under, Yarn Over Method: Using yarn under, yarn over while making this project is highly recommended, as this method creates tighter and nicer stitches.
Abbreviations
- mr – magic ring
- ch – chain
- st(s) – stitch(es)
- r – round
- slst – slip stitch
- sc – single crochet
- inc – increase
- dec – invisible decrease
- hdc – half double crochet
- dc – double crochet
- FLO – front loop only
- BLO – back loop only
- FO – fasten off
Pattern Instructions
Arms (x2)
In light brown, using continuous rounds:
- R1: 6 sc in MR [6]
- Lightly stuff along the way.
- R2-R7 (6 rounds): sc around [6]
- R8: Fold the arm flat and do 3sc across [3]
FO and leaving a long tail for sewing.
Feet (x2)
In light brown, using continuous rounds:
- R1: 6sc in MR [6]
- R2: sc around [6]
Ch1 and FO, leaving a short tail. No need to stuff. The feet will be crocheted into the body later.
Head & Body
Here we will start doing color changes between the primary color, light brown, and the secondary color, white. Switch color for the stitches written in white. We will also crochet using joined rounds.
Starting with light brown:
- R1: 6sc in MR [6]
- R2: 6inc [12]
- R3: (sc, inc)x6 [18]
- R4: (sc, inc, sc)x6 [24]
- R5: (3sc, inc)x6 [30]
- R6-9 (4 rounds): sc around [30]
- R10: 6sc, hdc, dc, hdc, 12sc, hdc, dc, hdc, 6sc [30]
- R11: 6sc, hdc, dc, hdc, 12sc, hdc, dc, hdc, 6sc [30]
- R12: (3sc, dec)x2, (3sc, dec)x2, sc, 2sc, dec, 3sc, dec [24]
If using safety eyes, put them in between R9 and R10, 4 visible sts apart. They should be around 3-4 white sts from the brown part, on each side.
- R13: (2sc, dec)x2, (2sc, dec)x2, sc, sc, dec, 2sc, dec [18]
Start stuffing the head firmly, making sure the cheeks are well-stuffed to give a chubby look.
- R14: (2sc, inc)x2, sc, sc, inc, 2sc, inc, (2sc, inc)x2 [24]
- R15: (3sc, inc)x2, sc, 2sc, inc, 3sc, inc, (3sc, inc)x2 [30]
- R16-17 (2 rounds): 11sc, 9sc, 10sc [30]
In the next two rounds, feel free to move the white stitches by one or two stitches to either direction so that the white part stays centered according to your yarn and tension.
- R18: 12sc, 7sc, 11sc [30]
- R19: 14sc, 3sc, 13sc [30]
Cut the white yarn as we won’t need it anymore.
- R20: sc around [30]
- R21: (2sc, inc, 2sc)x6 [36]
- R22-24 (3 rounds): sc around [36]
- R25: (2sc, dec, 2sc)x6 [30]
- R26: (3sc, dec)x6 [24]
R27: In this round we will crochet the feet into the round. The stitches below with the feet are done in the body – you just put the hook through the feet first.
- (sc, dec, sc)x2,
- now with the first foot: (sc, dec, sc)
- then sc, dec, 2sc,
- now with the second foot: (dec, 2sc)
- then dec, sc [18]
Stuff the body firmly as you go.
- R28: (sc, dec)x6 [12]
- R29: dec around [6]
Finish stuffing. FO and close the hole by threading the yarn through a needle and going through the front loops of all 6 sts. Then pull the hole closed.

Feet Guide
Step 1: While still having a loop on your hook, fold one foot so that it has 3 sts across (3 pairs with 2 sts), put the hook through and align it with the body.
Step 2: While having the foot on your hook, go through both loops of the stitch in the body. Yarn under and pull the loop through the stitch of the body and the pair of sts in the feet. You should have two loops on the hook.
Step 3: Yarn over and pull through both loops so that you have one remaining. You are now finished with that stitch!
For the decrease stitch, repeat step 1 above, but instead of going through both loops of the next stitch the body in step 2, simply go through the two front loops of the next two stitches (just like a normal decrease). Then complete step 3 as normal.
Snout
With white yarn:
- ch6,
- Starting in 2nd chain from the hook, 2hdc, slst, 2hdc [5]
Tie the two ends together to secure. FO, leaving a long tail for sewing.
Tail
With light brown yarn, using joined method:
- R1: 4sc in MR [4]
- R2: sc around [4]
- R3: (sc, inc)x2 [6]
- R4: sc around [6]
- R5: (sc, inc, sc)x2 [8]
- R6: sc around [8]
- R7: (3sc, inc)x2 [10]
FO, leaving a long tail for sewing. Stuff.
Ears (x2)
With light brown yarn:
- R1: 3sc in MR [3]
Pull tight and do not slip stitch at the end as it should stay as a semicircle. FO and tie together the ends for security, leaving a long tail for sewing.
Assembly
Snout: Sew or glue the snout in between the eyes, covering R10-R12.
Ears: Sew them on either side of the head, covering R8-R10, about 1 visible stitch away from the white part.
Tail: Sew the tail on the back of the otter, making sure it is aligned in the center between feet. The tail should cover R22-R26. By putting pressure on the end you could make it tilt upwards slightly if you would want that look.
Arms: Sew arms diagonally on each side, the base covering R15-18, just below the ear. Then sew the inner part of the arms to the body to keep them sturdy. The hands should be 7-8 sts apart seen from the front (enough to attach the pot).
Nose: Using felt in black or brown, cut out an oval shape, about 1 st in width and length. Glue it to the middle of the snout, slightly towards the upper part. Alternatively embroider a nose with black or brown yarn.

Pot & Soil
For the pot: Using yellow yarn and working in a joined round:
- R1: 8sc in MR [8]
- R2: (sc, inc)x4 [12]
- R3: (BLO) sc around [12]
- R4-5: sc around [12]
- R6: (FLO) hdc around [12]. Mark the first back loop with a stitch marker as it makes things easier later.
Slip stitch into the next stitch and ch1 for security. FO and weave in the tail in the pot.
For the soil: Using dark brown yarn and working in a joined round:
- R1: 5sc in MR [5]
- R2: inc around [10]
Slip stitch into the next stitch, FO and leave a long tail for sewing.
Leaf
Using green yarn, for one leaf:
- ch5, starting in the second chain from hook, slst, 2hdc, slst [4]
For two leaves together:
- ch5, from the second chain from hook, slst, 2hdc, slst,
- ch6, starting in the second chain from hook, slst, 3hdc, slst [9]
Tie together the ends and FO, leaving a long tail for sewing.
Finishing Steps
Sew the soil to the pot using the back loops that we left while making the pot. Start stuffing about two-thirds of the pot and finish stuffing when you are almost finished sewing the soil.
Sew the leaves on the top of the pot in the center. For extra security you can tie the ends together when you weave in them after you have finished sewing.
Lastly, attach the pot between the otters arms by glue or using a separate thread, whose ends you tie together at the back of the otter before tucking them in.
Optional: Add blush with pink makeup or by cutting out ovals in pink felt and glue next to the eyes.
Tips for Success
Use velvet yarn if you can. The original pattern was made with 2mm velvet yarn, and it really does give this otter that soft, textured look that makes it so irresistible. If you’re new to velvet yarn, just know that it can be a little harder to see your stitches, so good lighting and a smaller hook size can really help.
Stuff the cheeks well. The instructions specifically mention stuffing the head firmly so the cheeks look chubby, and it makes a big difference. Don’t be shy with the polyfill in the head section.
Use a stitch marker for the pot. When you work R6 of the pot in the front loops, the pattern tells you to mark the first back loop with a stitch marker. This is really helpful later when you’re sewing the soil on, so don’t skip that step.
Take your time with the feet. The feet get crocheted directly into the body during R27, which is a little different from most amigurumi. The feet guide section walks you through it step by step, and once you see how it works, it actually feels pretty clever.
Leave long tails. For nearly every piece you make separately, you’ll need a long tail for sewing. It’s better to leave too much than too little. You can always trim the extra.
Frequently Asked Questions
Is this pattern good for beginners? It’s best suited for someone who has made at least one amigurumi before and is comfortable with basic stitches like single crochet, increases, and decreases. The feet technique is a little unique, but the pattern walks you through it with clear steps.
What kind of yarn works best for this otter? The pattern was made using 2mm velvet yarn, which gives the otter a soft, fuzzy texture. You can use regular sport or DK weight yarn too, but the finished look will be slightly different.
Can I sell the finished otter? Yes! You may sell finished plushies made from this pattern. Just be sure to credit the original pattern designer when you list or share your work.
How do I keep the feet from looking uneven? Make sure you fold each foot flat so there are 3 sts across before inserting your hook. Aligning them carefully with the body before you work each stitch will help keep everything symmetrical.
What size safety eyes should I use? The pattern recommends 5mm safety eyes. If you’re making this for a very young child, you can embroider the eyes with black yarn instead for safety.
")
Conclusion
My daughter picked up that little otter the morning after I finished it, and she carried it around the whole day. She even set it next to one of her real plants on the windowsill and said they were friends. That moment right there is exactly why I love making things with my hands.
This crochet otter amigurumi is one of those projects that feels special from the very first round. The color changes, the chubby little body, the tiny pot with leaves poking out, it all comes together into something genuinely sweet. Whether you’re making it as a gift or just for yourself, I hope you enjoy every stitch.


Leave a Comment